NextGen SDK | Android Integration
(Android NextGen SDK version 22.6.1)
Contact Sales Engineering
- Integrating the NextGen SDK
- Important Details About GPP
- Important Details About LGPD
- Important Details About GDPR
- Important Details About CCPA
- Download latest Demo App Apk from here
- Ads for Testing Purposes
- Showing Splash Ads
- Create an Activity that inherits from SmaatoSplashActivity and implements the methods getAdSpaceId and getNextActivity.
- Add the Activity to the manifest if you want to show the interstitial as splash screen.
- You can also start the splash ad after your splash screen.
- You can use the same EventListener as for standard interstitial ads.
- Showing Out-stream Ads
- Showing Splash Ads
Integrating the NextGen SDK
1.) Set up your account on SPX
2.) Configure your Android project
2.1) Add the following repository setup to your project’s main build.gradle file:
allprojects {
    repositories {
        google()
        jcenter()
        maven {
            url "https://s3.amazonaws.com/smaato-sdk-releases/"
        }
    }
}
2.2) Set the compile options to Java 8, (i.e. place the following line into your application module build.gradle file):
android {
    compileOptions {
        sourceCompatibility JavaVersion.VERSION_1_8
        targetCompatibility JavaVersion.VERSION_1_8
    }
}
Important Note: Smaato SDK minSdkVersion is Android 4.1 (API level 16).
2.3) Add dependencies to your application module build.gradle file.
For all Ad Types, make sure to include the latest version of the ADID collection library (ads-identifier):
implementation "com.google.android.gms:play-services-ads-identifier:$latestVersion"For all Ad Types, make sure the following dependency is in place:
implementation 'com.smaato.android.sdk:smaato-sdk:22.6.1'For Banner ads, then make sure the following dependencies are in place:
implementation 'com.smaato.android.sdk:smaato-sdk-banner:22.6.1'For Interstitial ads, then make sure the following dependencies are in place:
implementation 'com.smaato.android.sdk:smaato-sdk-interstitial:22.6.1'For Rewarded ads, then make sure the following dependencies are in place:
implementation 'com.smaato.android.sdk:smaato-sdk-rewarded-ads:22.6.1'For Native ads, then make sure the following dependencies are in place:
implementation 'com.smaato.android.sdk:smaato-sdk-native:22.6.1'For Out-stream videos, then make sure the following dependencies are in place:
implementation 'com.smaato.android.sdk:smaato-sdk-video-banner:22.6.1'2.4) Add the following permissions to your application AndroidManifest.xml file:
Mandatory permissions:
<uses-permission android:name="android.permission.INTERNET">
<uses-permission android:name="android.permission.ACCESS_NETWORK_STATE"></uses-permission></uses-permission>
Optional permissions:
<uses-permission android:name="android.permission.ACCESS_COARSE_LOCATION"></uses-permission>
2.5) If your application targets Android 5.0 (API level 21) or higher, then you need to add the following line to your application AndroidManifest.xml file:
<uses-feature android:name="android.hardware.location.network">
</uses-feature>
Optional Configuration:
i) If your application targets Android 9 Pie (API level 28) or higher, in order to send HTTP requests (using the unencrypted HTTP protocol instead of HTTPS, so that more Ads can be shown), then you need to configure the networkSecurityConfig attribute in the application tag in AndroidManifest.xml:
android:networkSecurityConfig="@xml/network_security_config"ii) Now create the network_security_config.xml in the XML resource directory with:
<!--?xmlversion="1.0"encoding="utf-8"?-->
<network-security-config>
<base-configcleartexttrafficpermitted="true">
</base-configcleartexttrafficpermitted="true"></network-security-config>
For more details regarding the Network security configuration, please see the official Google documentation: https://developer.android.com/training/articles/security-config
3.) Proguard Configuration
If you’re using Proguard in your project, please add the following lines to your Proguard config file, as per your requirements:
-keep public class com.smaato.sdk.** { *; }
-keep public interface com.smaato.sdk.** { *; }
4.) Initialize Smaato SDK in your Application
4.1) Add to your Application.OnCreate() method to the following line, to initializes the Smaato SDK:
Application.OnCreate()
SmaatoSdk.init(this, publisherId);4.2) You can configure additional parameters for the SDK by passing the Config parameter to the init method.
Application.OnCreate()
Config config = Config.builder()
        .setLogLevel(LogLevel.INFO)
        .setHttpsOnly(false)
        .build();
SmaatoSdk.init(this, config, publisherId);
4.3) Along with the basic Config, we have also introduced configuring logs to debug issues or errors faced while using SDK. This would implement by using LogLevel DEBUG.
Application.OnCreate()
Config config = Config.builder()
        .setHttpsOnly(false)
        .enableLogging(true)
        .setLogLevel(LogLevel.DEBUG)
        .build();
SmaatoSdk.init(this, config, publisherId);
From SDK v22.6.0 onwards we have also added support for Smaato initialisation listener with initialisation callbacks that would notify the developers if Smaato SDK initialisation has been done successfully or not.
Application.OnCreate()
SmaatoSdk.SmaatoSdkInitialisationListener smaatoSdkInitialisationListener = new SmaatoSdk.SmaatoSdkInitialisationListener() {
            @Override
            public void onInitialisationSuccess() {
                // Initialisation is successful.
            }

            @Override
            public void onInitialisationFailure(String errorMsg) {
                // Initialisation has failed.
                // String "errorMsg" will display reason for failure.
            }
        };
SmaatoSdk.init(this, smaatoConfig, publisherId, smaatoSdkInitialisationListener);
4.4) Additionally, it is recommended to configure the SDK with user information. This is an optional step and can be implemented at a later time using the following configurations:
Application.OnCreate()
SmaatoSdk.setKeywords(...);
SmaatoSdk.setSearchQuery(...);
SmaatoSdk.setGender(...);
SmaatoSdk.setAge(...);
SmaatoSdk.setLatLng(...);
SmaatoSdk.setRegion(...);
SmaatoSdk.setLanguage(...);
SmaatoSdk.setZip(...);
SmaatoSdk.setCoppa(...);
SmaatoSdk.setGPSEnabled(...);
SmaatoSdk.setWatermarkEnabled(...);
GPSEnabled flag allows to get user’s location by Smaato SDK automatically and put it inside ad requests.
Important Details About GPP
Global Privacy Platform is a single protocol designed to streamline transmitting privacy, consent, and consumer choice signals from websites and apps to ad tech providers. IAB Tech Lab stewards the development of these technical specifications.
The GPP standardizes storage locations and naming for the content of the GPP data and GPP string so that ad tags embedded in mobile apps can find the GPP data and string in a consistent way.
The pre-parsed GPP data as well as the GPP string shall be stored under NSUserDefaults(iOS) or SharedPreferences (Android). This will allow:
- Vendors to easily access GPP data
- GPP data to persist across app sessions
- GPP data to be portable between CMPs to provide flexibility for a publisher to exchange one CMP SDK for another
- Vendors within an app to avoid code duplication by not being required to include a GPP string decoder while still enabling all typical use cases
Note: If a Publisher chooses to remove a CMP SDK from their app they are responsible for clearing all IABGPP_* vestigial values for users so that vendors do not continue to use the GPP data therein.
Smaato SDK will then read the values from NSUserDefaults/SharedPreferences which is then passed to the ad call. Following are the strings SDK will query from :
NSUserDefaults (iOS) or SharedPreferences (Android) values
|
Key Name
|
Data type
|
Description
|
|---|---|---|
| IABGPP_HDR_GppString | string | Full consent string in its encoded form. e.g “DBACNYA~CPXxRfAPXxRfAAfKABENB-CgAAAAAAAAAAYgAAAAAAAA~1YNN” |
| IABGPP_GppSID | string | Section ID(s) considered to be in force. Multiple IDs are separated by underscore, e.g. “2_3” |
Important Details About LGPD User Consent
As a publisher you can pass LGPD user consent to Smaato SDK. LGPD consent is Boolean type it can have following values:
| LGPD_CONSENT parameter value | Description |
|---|---|
| True | Explicit Signal that user has given Consent. |
| False | Explicit Signal that user has not given Consent. Smaato will run Contextual Ads with dropped PII in this case. |
| Unset value | If no explicit Signal is set, the publisher chooses to only call Smaato if they have enough legal basis for Targeted Advertising under LGPD. |
As publisher you can set LGPD consent parameter after Smaato SDK initialisation:
Kotlin
// initialize the Smaato SDK
SmaatoSdk.init(this, "SMAATO_PUBLISHER_ID")
//Set LGPD consent
SmaatoSdk.setLgpdConsentEnabled(true)
Java
// initialize the Smaato SDK
SmaatoSdk.init(this, "SMAATO_PUBLISHER_ID");
//Set LGPD consent
SmaatoSdk.setLgpdConsentEnabled(true);
Important Details About GDPR
As a publisher, you should integrate a Consent Management Platform (CMP) and request for vendor and purpose consents as outlined in IAB Europe’s Mobile In-App CMP API v1.0: Transparency & Consent Framework or IAB Tech Lab – CMP API v2.
You can find a reference implementation of a web-based CMP and the corresponding native wrappers here in the IAB’s GDPR-Transparency-and-Consent-Framework.
You can find a reference implementation how is a CMP used in-app here in the IAB’s Consent Management Platform API.
If you are embedding your own custom CMP, the collected end-user consent information needs to be stored in SharedPreferences using the following keys:
Important Note: Smaato SDK minSdkVersion is Android 4.1 (API level 16).
Transparency and Consent Framework v2 :
| Key | Type | Description |
|---|---|---|
IABTCF_gdprApplies | NSNumber | “1” = Subject to GDPR “0” = Not subject to GDPR “-1” or unset = Undetermined (default before initialization) |
IABTCF_TCString | NSString | Base64-encoded consent string as defined in IAB Tech Lab – Consent string and vendor list formats v2 |
Important Note: If the key IABTCF_gdprApplies is set to “1”, then you as a publisher need to make sure the key IABTCF_TCString contains a valid consent string (user was asked to provide consent before serving the ad). Otherwise, such ad requests will be dropped on the server-side without a return. If the key IABTCF_gdprApplies is set to 0, then you do not need to set key IABTCF_TCString.
Sample of GDPR Saving in SharedPreferences
import android.content.SharedPreferences;
import android.preference.PreferenceManager;

...
// User is not subject to GDPR
SharedPreferences sharedPref = PreferenceManager.getDefaultSharedPreferences(context_here);
SharedPreferences.Editor editor = sharedPref.edit();
editor.putString("IABTCF_gdprApplies", 0);
editor.commit();
// Use this example above to set values for the rest of the GDPR keys
Important Details About CCPA
The California Consumer Privacy Act (CCPA) was created to provide California consumers with greater transparency and control over their personal information. In many ways, the CCPA is a first of its kind regulation in the United States that seeks to create broad privacy and data protection rules that apply to all industries doing business in the jurisdiction of California, rather than focusing on a single sector or specific data collection and use practices.
For more information about the CCPA regulation, please check out the Smaato FAQ. You can also review the IAB’s U.S. Privacy String documentation.
For Publishers with California- Based Users
As a publisher, you need to make sure to request consent from California-based users (to give or refuse consent / to opt-out or opt-in ) about private data transfer. This answer should be saved in SharedPreferences with key “IABUSPrivacy_String” in the US Privacy String format (CCPA Opt-Out Storage Format).
The Smaato NextGen SDK reads this value in the key “IABUSPrivacy_String” if it exists and uses this as an optional parameter for all ad requests. You can use SmaatoSdk#getUsPrivacyString method to get a value which is currently stored under the “IABUSPrivacy_String” key. Note that default value is an empty string.
Sample of US Privacy String Saving in SharedPreferences
SharedPreferences sharedPref = PreferenceManager.getDefaultSharedPreferences(context)
SharedPreferences.Editor editor = sharedPref.edit();
editor.putString("IABUSPrivacy_String", "iab string");
editor.commit();
Important Note About Fullscreen AdspacesNextGen SDK reads that value by key "IABUSPrivacy_String" if it exists and uses it as optional parameter for all ad requests.
Currently, only the Interstitial Multi-Ad Format is compatible for Fullscreen Adspaces with Smaato NextGen SDK. In order to monetize your fullscreen Adspaces in SPX with Smaato NextGen SDK, you need to select the option for Interstitial (Display & Video). All other Fullscreen options will not work at this time.
Please check if the Interstitial (Display & Video) feature is enabled in your SPX account. If you do not see the option for Interstitial (Display & Video) in the Ad Format dropdown, please contact your Smaato Account Manager to enable this.
- When creating your Fullscreen Adspaces in SPX, choose the Interstitial (Display & video) option as the Ad format. (Image 1)
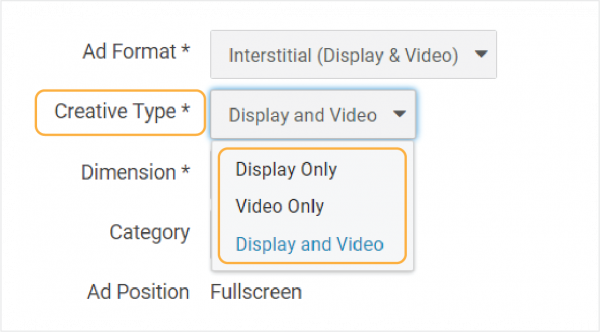
- For the Creative Type you will have three options to choose from (Image 2):
- Display Only for Rich Media Ads.
- Video Only for Video Ads.
- Display and Video will support either Rich Media or Video Ads.
Image 1: Ad Format dropdown selection
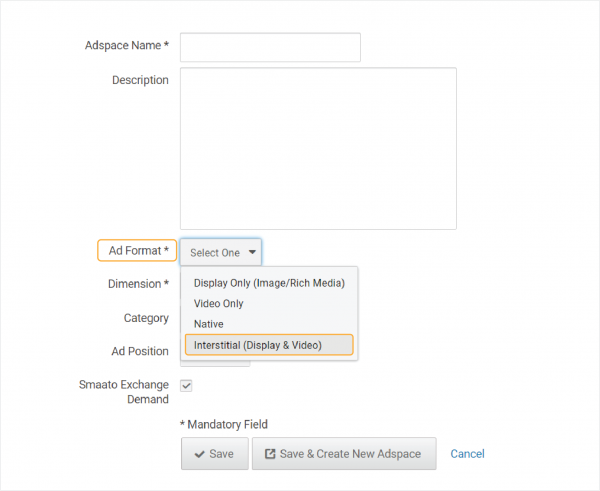
Image 2: Creative Type dropdown selections
Download latest Demo App Apk from here
Ads for Testing Purposes
Important Note: All AdSpaces can be used on both Android and iOS platforms and do not require any SPX changes.
| Publisher ID: 1100042525 | ||
| Adspace ID | Type | Description |
|---|---|---|
| 133149964 | Rich Media | Banner / Med-rect / Leaderboard / Skyscraper |
| 133149963 | Static Image | Banner / Med-rect / Leaderboard / Skyscraper |
| 133149965 | MRAID | Banner / Med-rect / Leaderboard / Skyscraper |
| 133150211 | Rich Media / Video | Interstitial (Video with an end-card + Rich Media Interstitial for 320×480, 480×320, 1024×768 & 768×1024) |
| 133149967 | Video | Skippable Video |
| 133149969 | Rewarded | Rewarded Video |
| 133149968 | Rewarded | Rewarded Video without an end-card |
| 133149966 | Native | Native |
5.) Showing Banner Ads
5.1) Add BannerView to your layout XML:
<com.smaato.sdk.banner.widget.BannerView
    android:id="@+id/bannerView"
    android:layout_width="wrap_content"
    android:layout_height="wrap_content" />
Note: to avoid any unexpected behaviours in case if you create an instance of BannerView manually, but not via xml, it is important to pass Activity’s Context into BannerView’s constructor
5.2) In Activity/Fragment, that uses the above layout, get BannerView:
BannerView bannerView = (BannerView) findViewById(R.id.bannerView);
5.3) Call loadAd() with your adspaceId and desired bannerAdSize in order to start Ad loading:
bannerView.loadAd(adspaceId, bannerAdSize);
5.4) Optionally, you can also set BannerView.EventListener to listen to events describing the advertisement lifecycle:
bannerView.setEventListener(new BannerView.EventListener() {
    @Override
    public void onAdLoaded(@NonNull BannerView bannerView) {}
    @Override
    public void onAdFailedToLoad(@NonNull BannerView bannerView, @NonNull BannerError bannerError) {}
    @Override
    public void onAdImpression(@NonNull BannerView bannerView) {}
    @Override
    public void onAdClicked(@NonNull BannerView bannerView) {}
    @Override
    public void onAdTTLExpired(@NonNull BannerView bannerView) {}
});
5.5) When your UI component (that hosts the BannerView) is being destroyed, BannerView.destroy() should be called in order to properly release BannerView resources. E.g.:
YourActivity.class
class YourActivity {
    ...
    @Override
    public void onDestroy() {
        super.onDestroy();
        bannerView.destroy();
    }
}
6.) Showing Interstitial Ads
6.1) Call Interstitial.loadAd() with your adspaceId and eventListener in order to start Ad loading:
Interstitial.loadAd(adspaceId, eventListener);
Important Note: The Smaato NextGen SDK keeps {@link java.lang.ref.WeakReference} on eventListener to prevent memory leaks. It is the responsibility of SOMA SDK’s user to hold the reference to a passed eventListener instance in order to keep it from being collected by the garbage collector. For the same reason the SOMA SDK’s user must keep a reference on the InterstitialAd object passed by onAdLoaded or else it could happen that the other methods of EventListener are not called.
6.2) Passed EventListener will be used to deliver events describing the advertisement lifecycle:
public interface EventListener {

    /**
     * This method will be invoked when an advertisement is successfully received.
     * <p>
     * It is invoked on main thread only.
     */
    void onAdLoaded(@NonNull InterstitialAd interstitialAd);

    /**
     * This method will be invoked when an advertisement request is failed.
     * <p>
     * It is invoked on main thread only.
     *
     * @param interstitialRequestError {@link InterstitialRequestError} the error.
     */
    void onAdFailedToLoad(@NonNull InterstitialRequestError interstitialRequestError);

    /**
     * This method will be invoked when an advertisement failed during loading or showing.
     * <p>
     * It is invoked on main thread only.
     *
     * @param interstitialError {@link InterstitialError} the error.
     */
    void onAdError(@NonNull InterstitialAd interstitialAd, @NonNull InterstitialError interstitialError);

    /**
     * This method will be invoked when a fullscreen interstitial ad is opened.
     * <p>
     * It is invoked on main thread only.
     */
    void onAdOpened(@NonNull InterstitialAd interstitialAd);

    /**
     * This method will be invoked when a fullscreen interstitial ad is closed.
     * <p>
     * It is invoked on main thread only.
     */
    void onAdClosed(@NonNull InterstitialAd interstitialAd);

    /**
     * This method will be invoked when user clicked on an ad.
     * <p>
     * It is invoked on main thread only.
     */
    void onAdClicked(@NonNull InterstitialAd interstitialAd);

    /**
     * This method will be invoked when an impression occurred.
     * <p>
     * It is invoked on main thread only.
     */
    void onAdImpression(@NonNull InterstitialAd interstitialAd);

    /**
     * This method will be invoked on when an advertisement's TTL(time to live) is expired.
     * <p>
     * Will be invoked on main thread only.
     * <p>
     *
     * @param interstitialAd {@link InterstitialAd} advertisement object View that received onAdTtlExpired event
     */
    void onAdTTLExpired(@NonNull InterstitialAd interstitialAd);
}
6.3) Optionally, you can change the background color for an InterstitialAd (default is black):
Using a color with 0xff as alpha value the InterstitialAd is shown with an opaque background.
interstitialAd.setBackgroundColor(0xff123456);
Using a color with a value different from 0xff as alpha value the InterstitialAd is shown with a (semi-) transparent background making the content of the app (partially) visible.
interstitialAd.setBackgroundColor(0xaa123456);
6.4) Optionally, you can change the time when the close button appears for an InterstitialAd (default value is 2 seconds):
For this use the parameter displayAdCloseInterval in AdRequestParams.
- If set to a value greater than 0, the close button on a display interstitial will be visible after the given seconds shown.
- If not set to any value or sets to 0, the close button appearance will behave as default. i.e. appearing on screen after 2 seconds.
Attention: This parameter only works for interstitial ads with image or rich media contents, not for videos.
AdRequestParams adRequestParams = AdRequestParams.builder()
                .setDisplayAdCloseInterval(10) //Close button will appear after 10 seconds
                .build()

        Interstitial.loadAd(
                "adSpaceId",
                eventListener,
                adRequestParams
        )
6.5) Optionally, you can change the time for the skip button to appear in a video on an InterstitialAd (default value is 5 seconds):
For this use the parameter videoSkipInterval in AdRequestParams.
- If set to a value greater than 0, skip button on video interstitial will be visible after the given seconds of video play.
- If a value is found to be greater than the total length of video, skip button will not be visible on the screen.
- To disable the skip button appearing on screen for all ads, set the value to -1.
Attention: This parameter only works for interstitial ads, not for rewarded interstitial ads.
AdRequestParams adRequestParams = AdRequestParams.builder()
                .setVideoSkipInterval(9) //Skip button will appear after 9 seconds
                .build()

        Interstitial.loadAd(
                "adSpaceId",
                eventListener,
                adRequestParams
        )
6.6) Call showAd(activity) on a received InterstitialAd object:
new EventListener() {
    @Override
    public void onAdLoaded(@NonNull InterstitialAd interstitialAd) {
        interstitialAd.showAd(activity);
    }
    ...
};
7.) Showing Rewarded Interstitial Ads
7.1) Call RewardedInterstitial.loadAd() with adspaceId and EventListener in order to start Rewarded Interstitial Ad loading.
RewardedInterstitial.loadAd(adspaceId, eventListener);
Important Note: The Smaato NextGen SDK keeps {@link java.lang.ref.WeakReference} on eventListener to prevent memory leaks. It is the responsibility of Soma SDK’s user to hold the reference to a passed eventListener instance in order to keep it from being collected by the garbage collector.
7.2) As for Interstitial, EventListener will be used to deliver events describing the advertisement lifecycle:
EventListener
/**
 * A listener to provide with {@link RewardedInterstitial#loadAd} request
 * <p>
 * Events are always delivered on main thread.
 */
public interface EventListener {

    /**
     * This method will be invoked when an advertisement is successfully received.
     * <p>
     * It is invoked on main thread only.
     */
    void onAdLoaded(@NonNull RewardedInterstitialAd rewardedInterstitialAd);

    /**
     * This method will be invoked when an advertisement request is failed.
     * <p>
     * It is invoked on main thread only.
     *
     * @param rewardedRequestError {@link RewardedRequestError} failed request data object that contains next
     * ad request parameters: publisherId, adspaceId * and rewardedAdError {@link RewardedError}
     */
    void onAdFailedToLoad(@NonNull RewardedRequestError rewardedRequestError);

    /**
     * This method will be invoked when an advertisement failed during showing.
     * <p>
     * It is invoked on main thread only.
     *
     * @param rewardedInterstitialAd {@link RewardedInterstitialAd} advertisement object that received onClose event
     * @param rewardedError {@link RewardedError}
     */
    void onAdError(@NonNull RewardedInterstitialAd rewardedInterstitialAd, @NonNull RewardedError rewardedError);

    /**
     * This method will be invoked when an advertisement is closed by user.
     * <p>
     * Will be invoked on main thread only.
     * <p>
     * {@link RewardedInterstitialAd} advertisement object that received onClose event
     */
    void onAdClosed(@NonNull RewardedInterstitialAd rewardedInterstitialAd);

    /**
     * This method will be invoked on when an advertisement is clicked by user.
     * <p>
     * Will be invoked on main thread only.
     * <p>
     * {@link RewardedInterstitialAd} advertisement object that received onClick event
     */
    void onAdClicked(@NonNull RewardedInterstitialAd rewardedInterstitialAd);

    /**
     * This method will be invoked when an advertisement's playback is started.
     * <p>
     * Will be invoked on main thread only.
     * <p>
     * {@link RewardedInterstitialAd} advertisement object that received onStart event
     */
    void onAdStarted(@NonNull RewardedInterstitialAd rewardedInterstitialAd);

    /**
     * This method will be invoked when an advertisement's playback is completed successfully.
     * <p>
     * Will be invoked on main thread only.
     * <p>
     * {@link RewardedInterstitialAd} advertisement object that received onRewarded event
     */
    void onAdReward(@NonNull RewardedInterstitialAd rewardedInterstitialAd);

    /**
     * This method will be invoked when an advertisement's TTL(time to live) is expired.
     * <p>
     * Will be invoked on main thread only.
     * <p>
     * {@link RewardedInterstitialAd} advertisement object that received onTtlExpired event
     */
    void onAdTTLExpired(@NonNull RewardedInterstitialAd rewardedInterstitialAd);
}
7.3) When the ad is loaded and available for presentation call show() on a received RewardedInterstitialAd object:
EventListener eventListener = new EventListener() {
    @Override
    public void onAdLoaded(@NonNull RewardedInterstitialAd rewardedInterstitialAd) {
        rewardedInterstitialAd.showAd();
    }
    ...
}
8.) Showing Native Ads
Native ads might be presented (rendered) on the screen in two different ways:
- Manual rendering. It means you might fetch a native ad’s raw data from the NativeAdAssetsassets object and render it into your own custom view layout. You are responsible for downloading the ad’s creatives like the main images and icon.
- Auto rendering. You should create a special subclass that conforms to and implements the NativeAdView interface. This interface defines methods that allow the NextGen SDK to look for appropriated UI controls for a given type of native ad asset, and displays it directly into this certain control. The number of adopted controls from the NativeAdViewand their sizes/placements do not matter and depend on your UI/UX preferences. The NextGen SDK handles the downloading of ads creatives itself.
8.1) Create a custom layout to represent a native ad.
8.2) Load a native ad.
Use the NativeAdRequest object to set loading options:
shouldReturnUrlsForImageAssets – Indicates whether the icon and main image creatives should be downloaded. If set to False, the NextGen SDK downloads required creatives and provides all of them as Drawable objects. (True by default)
shouldFetchPrivacy – Indicates whether a link to the privacy policy page for the ad should be downloaded. If set to true the link will be rendered as an ImageView named “privacy” showing the privacy icon and starting the privacy policy page with a click on the icon. (True by default)
After that, call one of the overloaded methods:
NativeAd.loadAd(@NonNull Lifecycle owner, @NonNull NativeAdRequest request, @NonNull NativeAd.Listener listener)
NativeAd.loadAd(@NonNull LifecycleOwner owner, @NonNull NativeAdRequest request, @NonNull NativeAd.Listener listener)
NativeAd.loadAd(@NonNull View owner, @NonNull NativeAdRequest request, @NonNull NativeAd.Listener listener)
- If you are using Activities to build your UI and your Activity class extends AppCompatActivity from the AndroidX library, then use this as a LifecycleOwner.
- If your Activity does not extend from AppCompatActivity, then use com.smaato.sdk.sys.Lifecycling.of(this) to create LifecycleOwner.
- If you are using Fragments to build your UI and your Fragment class extends androidx.fragment.app.Fragmentfrom the AndroidX library, then use getViewLifecycleOwner()as a LifecycleOwner.
- You can use any View that contains your native ad view as a LifecycleOwner.
8.3) Render a native ad in NativeAd.Listener.onAdLoaded
If you have chosen auto rendering:
Create a NativeAdView implementation like in the example below:
class SmaatoNativeAdView implements NativeAdView {

    private final View binding;

    SmaatoNativeAdView(View binding) {
        this.binding = binding;
    }

    @Nullable
    @Override
    public TextView titleView() {
        return binding.findViewById(R.id.title);
    }

    @Nullable
    @Override
    public TextView textView() {
        return binding.findViewById(R.id.text);
    }

    @Nullable
    @Override
    public TextView sponsoredView() {
        // Return null if you don't have this kind of view
        return null;
    }

    @Nullable
    @Override
    public TextView ctaView() {
        return binding.findViewById(R.id.cta);
    }

    @Nullable
    @Override
    public View iconView() {
        return binding.findViewById(R.id.icon);
    }

    @Nullable
    @Override
    public View mediaView() {
        return binding.findViewById(R.id.media);
    }


    @Nullable
    @Override
    public View ratingView() {
        return binding.findViewById(R.id.rating);
    }

    @Nullable
    @Override
    public View privacyView() {
        return binding.findViewById(R.id.privacy);
    }

}
8.3a) To show RichMedia Ads : Add richMediaView() in NativeAdView implementation and pass view id of a Frame-layout to it like shown in the code snippet below.
@Override
public View richMediaView() {
    return binding.findViewById(R.id.richmedia);
}
8.3 b) To show Video Ads : Add videoView() in NativeAdView implementation and pass view id of a Frame-layout to it like shown in the code snippet below.
@Override
public View videoView() {
    return binding.findViewById(R.id.videoView);
}
Then render your NativeAd using NativeAdRenderer:
@Override
public void onAdLoaded(@NonNull NativeAd nativeAd, @NonNull NativeAdRenderer renderer) {
    View adView = ... // Inflate your ad view or create it programmatically

    NativeAdView nativeAdView = new SmaatoNativeAdView(adView); // Create NativeAdView
    renderer.renderInView(nativeAdView); // Render your view using SmaatoSDK
    // SmaatoSDK will care about loading all creatives and display them in certain views.

    // Register ad view for impression tracking and user clicks handling
    renderer.registerForImpression(adView);
    renderer.registerForClicks(nativeAdView.ctaView());

    content.addView(adView); // Add adView into your view hierarchy
}
If you have chosen manual rendering:
@Override
public void onAdLoaded(@NonNull NativeAd nativeAd, @NonNull NativeAdRenderer renderer) {
    View adView = ... // Inflate your ad view or create it programmatically

    // Register ad view for impression tracking and user clicks handling
    renderer.registerForImpression(adView);
    renderer.registerForClicks(adView.findViewById(R.id.cta));

    // Explicit rendering of raw assets into views
    NativeAdAssets assets = renderer.getAssets();
    adView.findViewById(R.id.title).setText(assets.title());
    adView.findViewById(R.id.text).setText(assets.text());
    adView.findViewById(R.id.cta).setText(assets.cta());

    // If you have chosen shouldReturnUrlsForImageAssets(true) it NativeAdRequest,
    // then you have care yourself about image creatives downloading and rendering,
    // using UrlConnection class or any library for image loading like Picasso or Glide.
    if (assets.icon() != null) {
        Picasso.load(assets.icon().uri()).into(adView.findViewById(R.id.icon));
    }

    // If you have chosen shouldReturnUrlsForImageAssets(false) (default),
    // then SmaatoSDK will care about loading all creatives and you will
    // able to use them like a Drawable objects
    if (assets.icon() != null) {
        adView.findViewById(R.id.icon).setImageDrawable(assets.icon().drawable());
    }

    //For manually rendering Richmedia/Mraid asset you will have to load the
    //asset in Webview
    if(assets.mraidJs() != null){
        adView.findViewById(R.id.richmediaWebView).loadData(assets.mraidJs(), "text/html", "UTF-8");
    }

    //For manually rendering Outstream vast asset you will have to load the
    //asset in Webview
    if(assets.vastTag() != null){
        adView.findViewById(R.id.outstreamWebView).loadData(assets.vastTag(), "text/html", "UTF-8");
    }

    content.addView(adView); // Add adView into your view hierarchy
}
8.4) Lastly, build and run the app. The native ads view should appear on the screen.

9.) Showing Splash Ads
9.1) Create an Activity that inherits from SmaatoSplashActivity and implements the methods getAdSpaceId and getNextActivity.
public class SplashAdActivity extends SmaatoSplashActivity {

    @NonNull
    @Override
    protected String getAdSpaceId() {
        return "130626426";
    }

    @NonNull
    @Override
    protected Class<? extends Activity> getNextActivity() {
        return MainActivity.class;
    }
}
Important Note: In contrast to a standard interstial ad the splash ad will show a close button after 3 seconds and will automatically close and jump to the next screen after 5 seconds.
9.2.1) Add the Activity to the manifest if you want to show the interstitial as splash screen.
<activity android:name=".SplashAdActivity">
    <intent-filter>
        <action android:name="android.intent.action.MAIN" />
        <category android:name="android.intent.category.LAUNCHER" />
    </intent-filter>
</activity>
9.2) You can also start the splash ad after your splash screen.
Intent intent = new Intent(this, SplashActivity.class);
startActivity(intent);
In this case you need to add the Activity to the manifest without the intent filters.
<activity android:name=".SplashAdActivity" />
9.3) You can use the same EventListener as for standard interstitial ads.
public class SplashAdActivity extends SmaatoSplashActivity {

    class MyEventListener extends EventListener {
        ...
    }

    @NonNull
    @Override
    protected String getAdSpaceId() {
        return "130626426";
    }

    @NonNull
    @Override
    protected Class<? extends Activity> getNextActivity() {
        return MainActivity.class;
    }

    @Override
    protected EventListener getEventListener() {
        return new MyEventListener();
    }
}
10.) Showing Out-stream Ads
10.1) Add VideoBannerView to your layout XML:
<com.smaato.sdk.banner.widget.VideoBannerView
    android:id="@+id/videoBannerView"
    android:layout_width="wrap_content"
    android:layout_height="wrap_content" />
Note: to avoid any unexpected behaviours in case if you create an instance of VideoBannerView manually, but not via xml, it is important to pass Activity’s Context into VideoBannerView’s constructor
10.2) In Activity/Fragment, that uses the above layout, get BannerView:
VideoBannerView videoBannerView = (VideoBannerView) findViewById(R.id.videoBannerView);
10.3) Call loadAd() with your adspaceId and desired videoBannerAdSize in order to start Ad loading:
videoBannerView.loadAd(adspaceId, bannerAdSize);
10.4) Optionally, you can also set BannerView.EventListener to listen to events describing the advertisement lifecycle:
videoBannerView.setEventListener(new BannerView.EventListener() {
    @Override
    public void onAdLoaded(@NonNull BannerView bannerView) {}
    @Override
    public void onAdFailedToLoad(@NonNull BannerView bannerView, @NonNull BannerError bannerError) {}
    @Override
    public void onAdImpression(@NonNull BannerView bannerView) {}
    @Override
    public void onAdClicked(@NonNull BannerView bannerView) {}
    @Override
    public void onAdTTLExpired(@NonNull BannerView bannerView) {}
});
10.5) When your UI component (that hosts the VideoBannerView) is being destroyed, VideoBannerView.destroy() should be called in order to properly release VideoBannerView resources. E.g.:
YourActivity.class
class YourActivity {
    ...
    @Override
    public void onDestroy() {
        super.onDestroy();
        videoBannerView.destroy();
    }
}
Last Modified: April 12, 2024 at 4:52 pm